The MCC wireless system is a secure system available to MCC students and employees. All you need to login is your user name and password you use for network access.
The MCC wireless system is a secure system available to MCC students and employees. All you need to login is your user name and password you use for network access.
The MCC wireless system is a secure system available to MCC students and employees. All you need to login is your user name (S######## or E#######) and password you use for network access.
MCC IT recommends keeping your personal devices current with operating system, driver and security updates, as MCC-Wireless may not support older operating systems, or systems that have not been updated for an extended period.
To get started use the links above to select your device type for help connecting. In the "Help Topics" table to find the best page for your device.
If you cannot find your device type, please contact IT for all the specific info needed to get connected.
Your MCC username and password is assigned and used across many services. If you loan your credentials out to help someone get connected to the wireless system they could then also log in as you to Metrolink, Canvas, and more.
Use the Windows Search option to search for the System Setting for your Wi-Fi adapter.
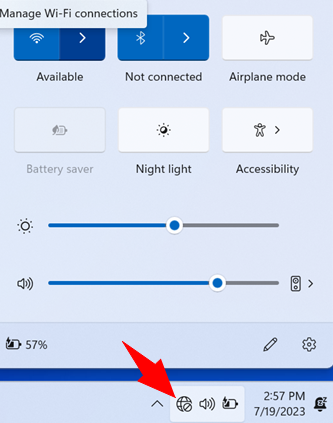
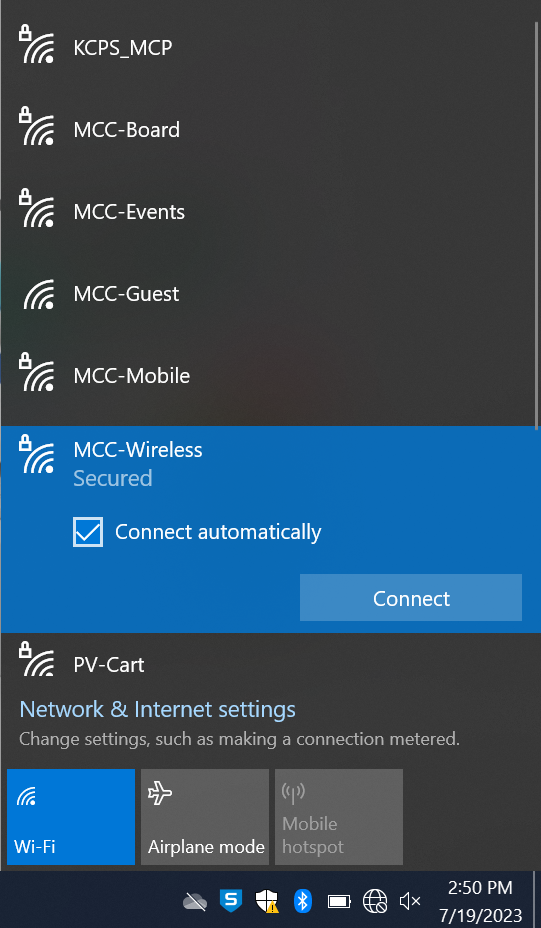
Step 1: Click on the network icon in the lower right corner.
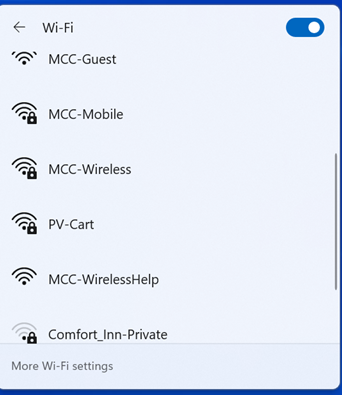
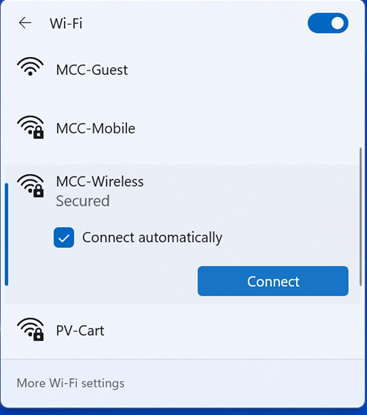
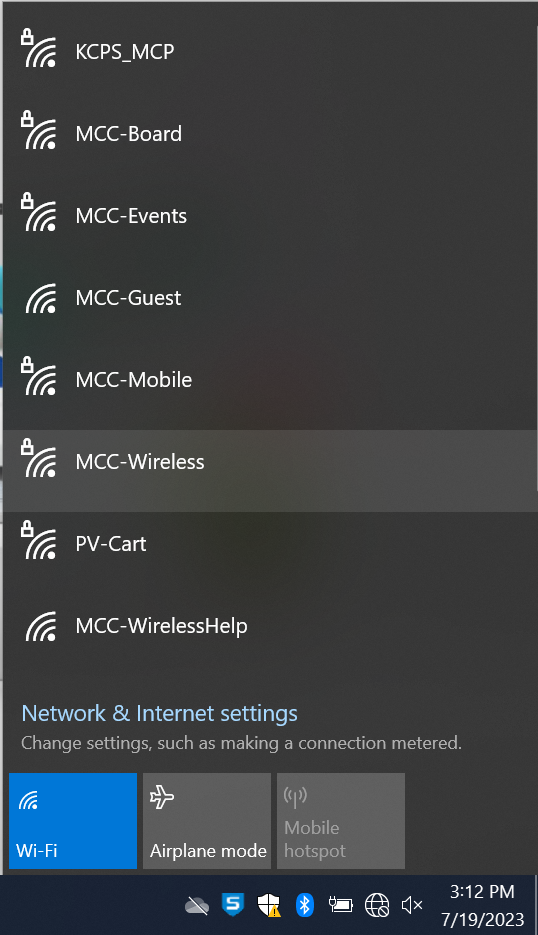
Step 2: Select MCC-Wireless and check the "Connect Automatically box". Click "Connect".
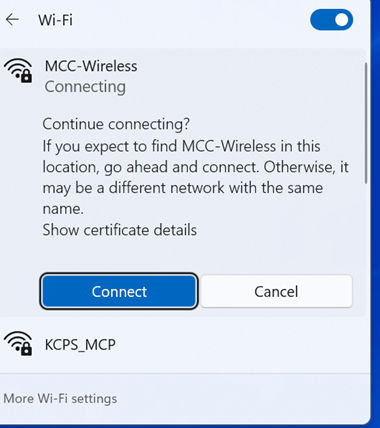
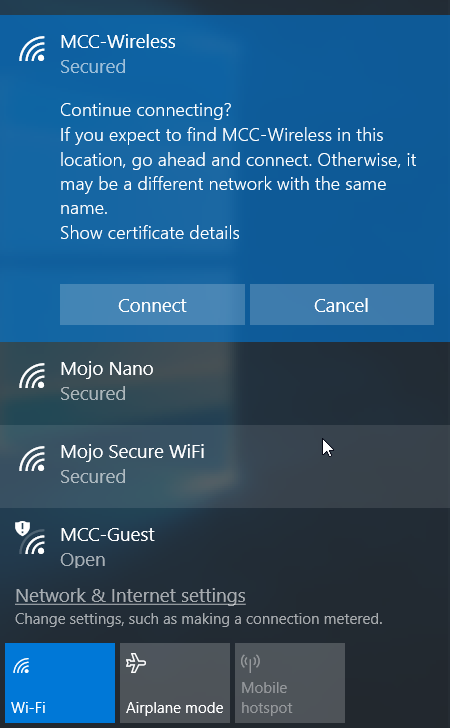
Step 3: A Certificate Details message box may appear. If so, click "Connect".
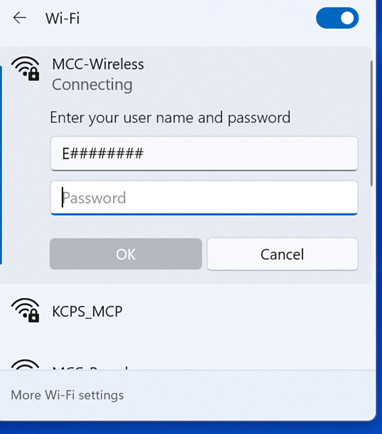
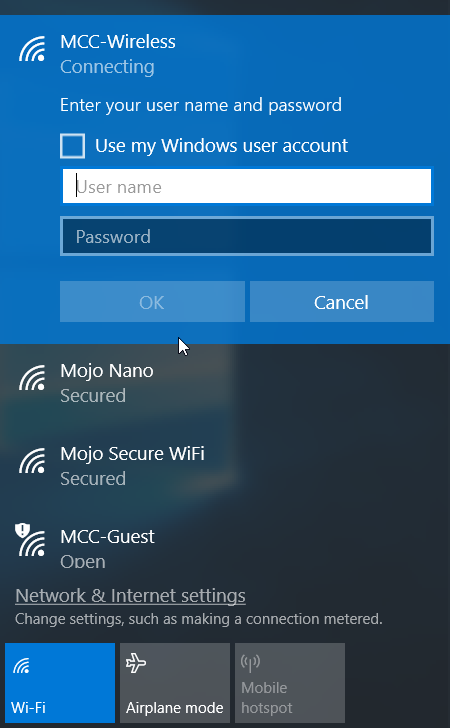
Step 4: A login window will display, prompting you to enter your login information. Enter your MCC username (E####### or S#######) and password, then click "Ok".
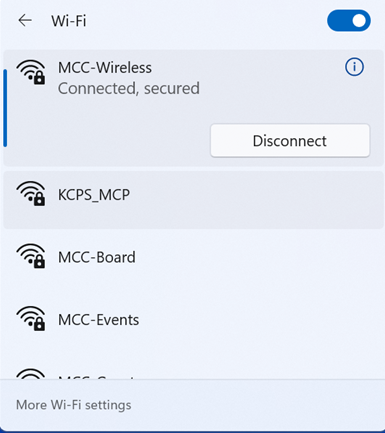
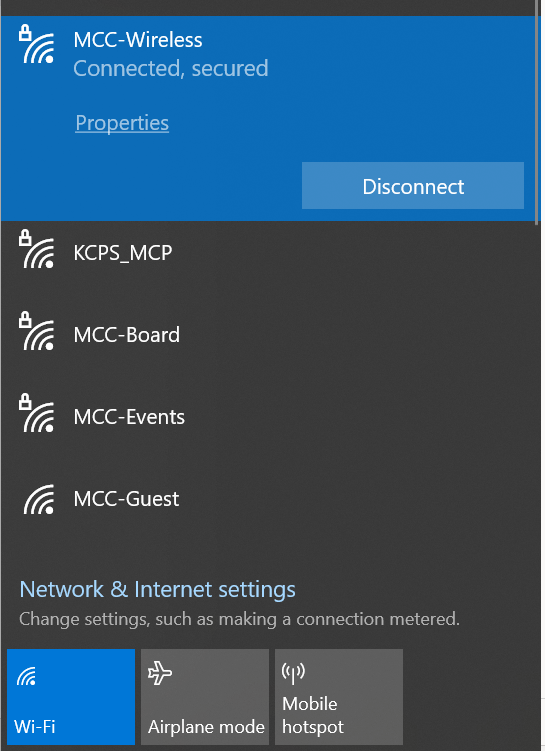
Step 5: You should now be connected!
Use the Windows Search option to search for the System Setting for your Wi-Fi adapter.
Step 1: Click on the network icon in the lower right corner.
Step 2: Select MCC-Wireless and check the "Connect Automatically box". Click "Connect".
Step 3: A Certificate Details message box may appear. If so, click "Connect".
Step 4: A login window will display, prompting you to enter your login information. Enter your MCC username (E####### or S#######) and password, then click "Ok".
Step 5: You should now be connected!
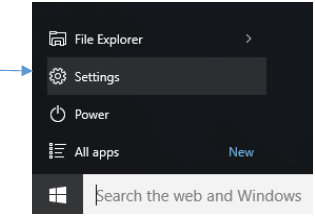
Step 1. Click on the Start icon at the bottom left

Step 2: Click on Settings.
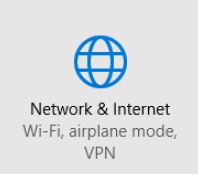
Step 3: Click on Network and Internet
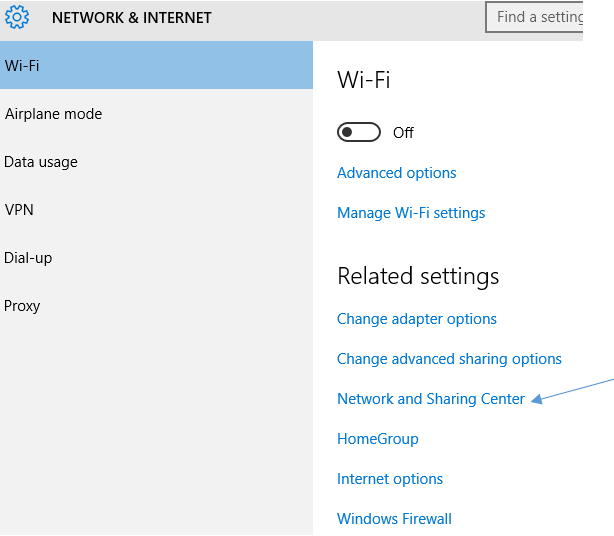
Step 4: Click on Network and Sharing Center on the bottom right
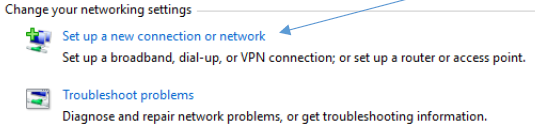
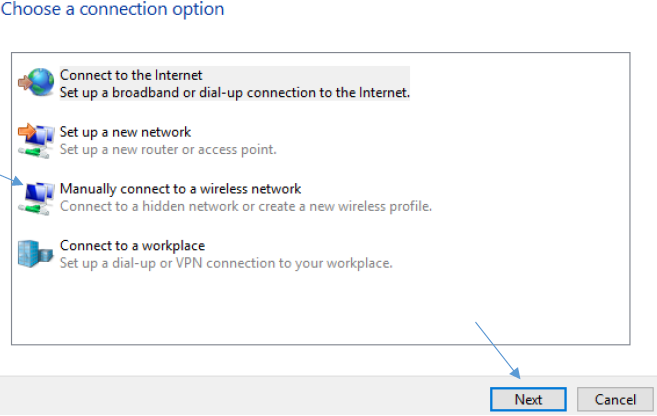
Step 5: Click on Setup a New Connection or Network
Step 6: Click on Manually Connect to a Wireless Network and click Next
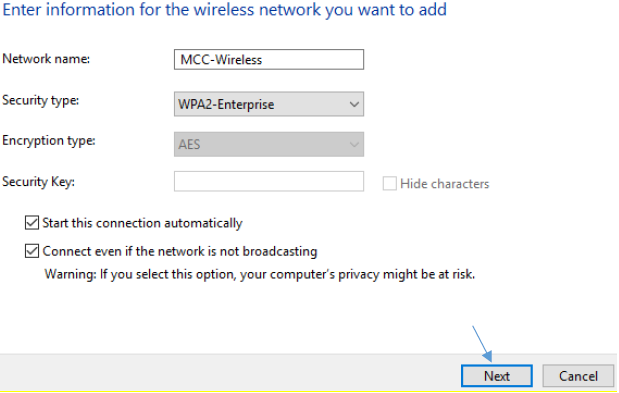
Step 7: Enter the following information:
Network name: MCC-Wireless
Security type: WPA2-Enterprise
Encryption type: AES
Check: Start this connection automatically
Check: Connect even if the network is not broadcasting
Click on Next
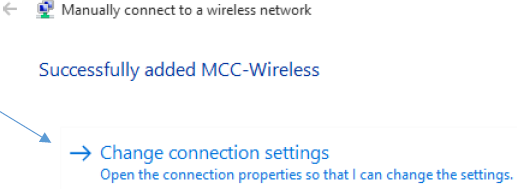
Step 8: Click on Change Connection Settings
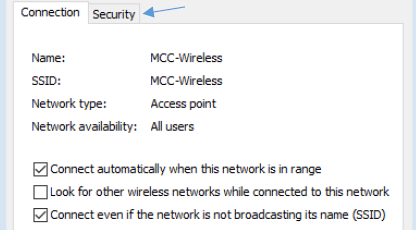
Step 9: Check on the following two options:
Connect automatically when this network is in range
Connect even if the network is not broadcasting its name (SSID)
Click on Security
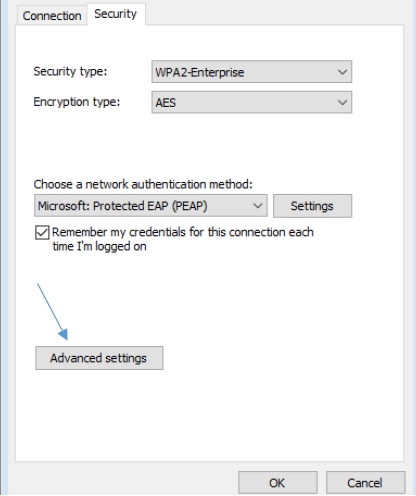
Step 10: Check that you have the following settings:
Security type: WPA2-Enterprise
Encryption type: AES
Choose a network authentication method: Microsoft Protected EAP (PEAP)
Check: Remember my credentials for this connection each time I'm logged on
Click on Advanced Settings
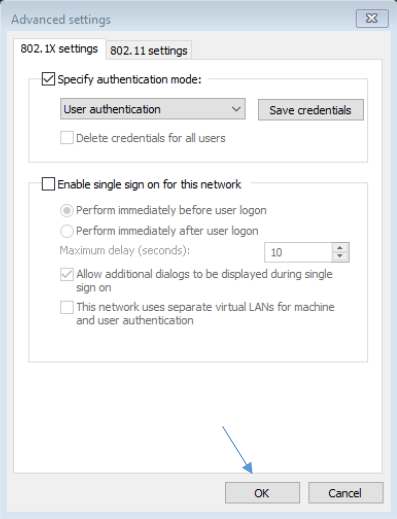
Step 11: Check Specify authentication mode
In the drop down below "Specify authentication mode" change it to User authentication
Click OK
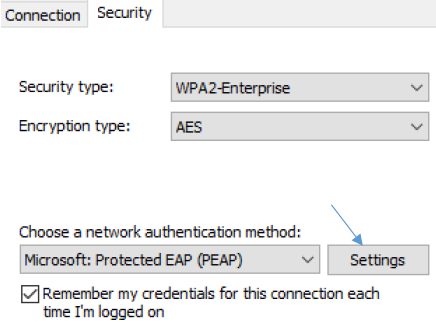
Step 12: Click on Settings across from Microsft Protected EAP (PEAP)
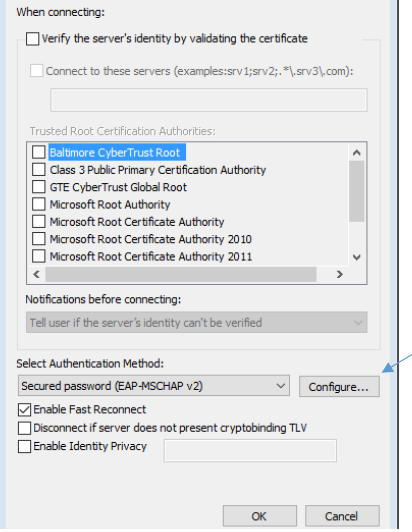
Step 13: Uncheck Verify the server's identity by validating the certificate
Select: Authentication Method: Secured password (EAP-MSCHAP v2)
Check: Enable Fast Reconnect
Click on Configure
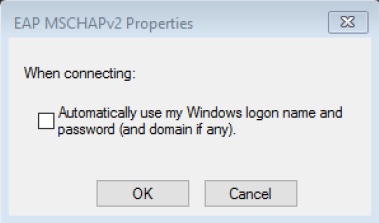
Step 14: Uncheck Automatically use my Windows logon name and password (and domain if any).
Click on OK
Step 15: We should be ready to login to the wireless. Close all wireless settings windows
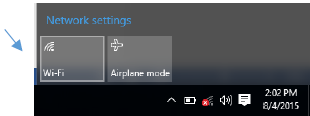
Step 16: Click on the network icon at the bottom right of your screen
Step 17: Click on Wi-Fi
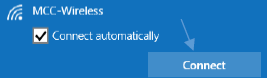
Step 18: Click on MCC-Wireless

Step 19: Check Connect Automatically
Click on Connect
Step 20: Enter your myMCCKC username and password

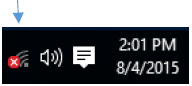
Step 21: You should now be connected and your wireless icon should change to this icon

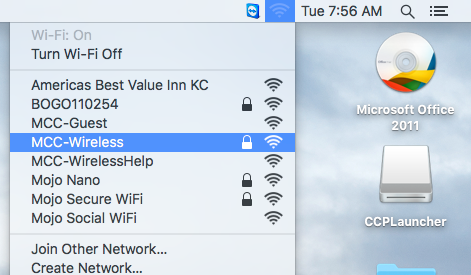
Step 1: Click on the network icon at the top right of your screen.
Step 2: Click on "MCC-Wireless"
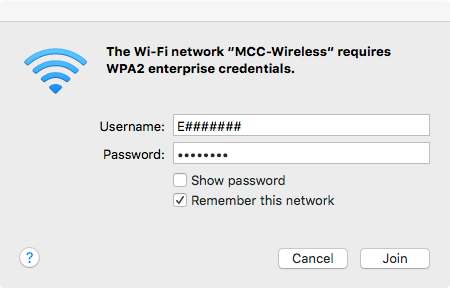
Step 3: For username enter your MCC login (E######## or S########), enter your MCC password, make sure that "Remember this network" is checked, and click "Join".
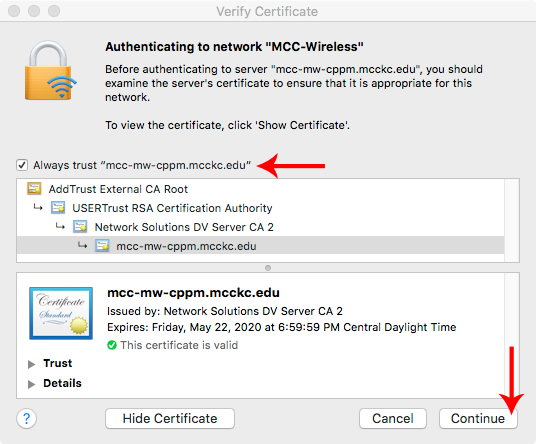
Step 4: A window is going to pop up about Authenticating to "MCC-Wireless". Click on "Show Certificate".
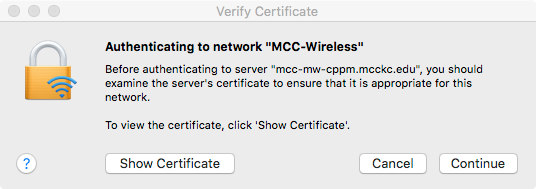
Step 5: Make sure there is a check next to "Always trust 'mcc-mw-cppm.mcckc.edu'" and click on "Continue".
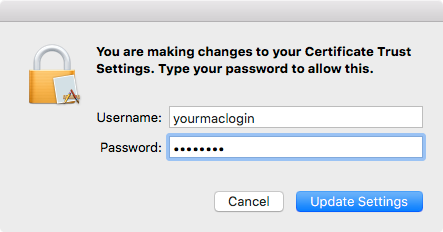
Step 6: It will prompt you for a login but this will be your Mac’s login and not the MCC login. Please enter your Mac’s login and click on "Update Settings".
All done. You should be connected.
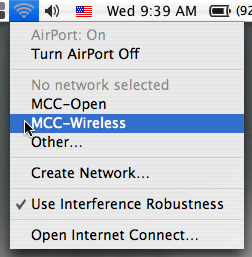
Step 1: Find your Airport icon and click on it to bring down your Airport menu. Once your Airport card is turned on you should see the "MCC-Wireless network, and you simply click on it.
Step 2: After the Airport window comes up, you want to use your user name and password for network access. Both the user name and password fields are case sensitive.
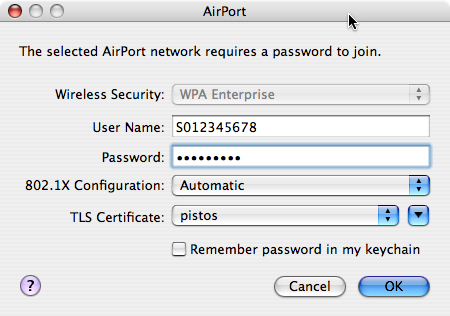
Step 3: After you click OK you will get a window labeled "Verify Certificate". Click the "Show Certificate" button and then make sure there is a check mark next to "Always trust these certificates". Then click Continue.


It might take 20 seconds or so, but if you typed in a valid user name and password you should now be connected.
To connect your Chromebook to the MCC-Wireless network, follow the steps below.
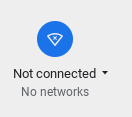
Step 1. Click the network icon in the lower-right corner of your screen.

Step 2. Click the "Not Connected" network icon.
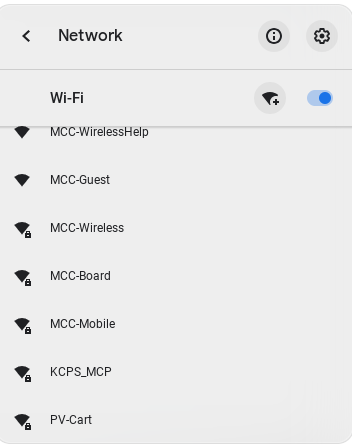
Step 3. Select your MCC-Wireless from the menu that appears.
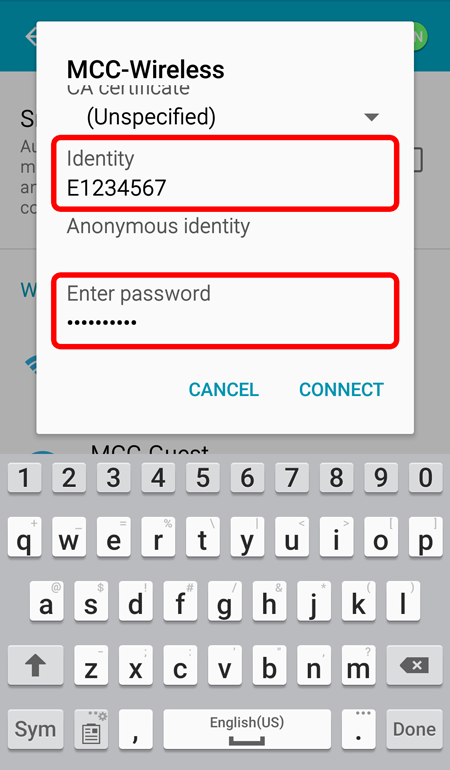
Step 4. Fill in the following information:
    EAP Method = PEAP
    EAP Phase 2 Authentication = Automatic
    Server CA certificate = Do Not Check
    Identity = Your username (E######## or S#######)
    Password = Your password

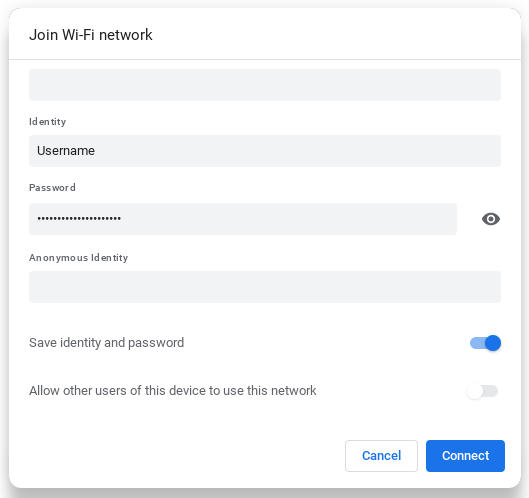
Step 5. Click the "Connect" button.
To connect an Android phone or tablet to the MCC Wireless network:
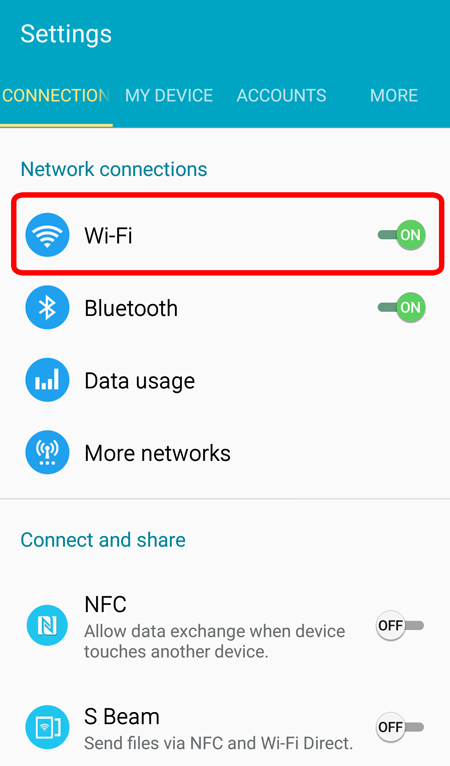
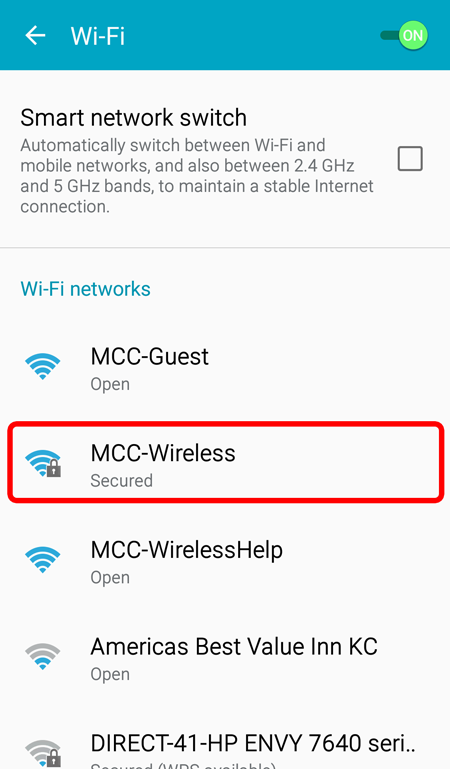
Step 1. Press the Home button, and then press the Apps button. Navigate to Settings.

Step 2. Under "Wireless and Networks", make sure "Wi-Fi" is turned on the press Wi-Fi.
Step 3. You may have to wait a moment as your Android device detects wireless networks in range, and displays them in a list. To rescan for available networks at any time, select Scan.
Step 4. Press the Wi-Fi network name MCC-Wireless.
Step 5. When prompted, enter your myMCCKC UserID and Password, and press Connect. This will complete your connection to the wireless network.
To connect an Apple mobile device to the MCC Wireless network:
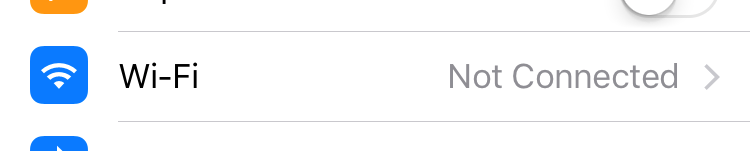
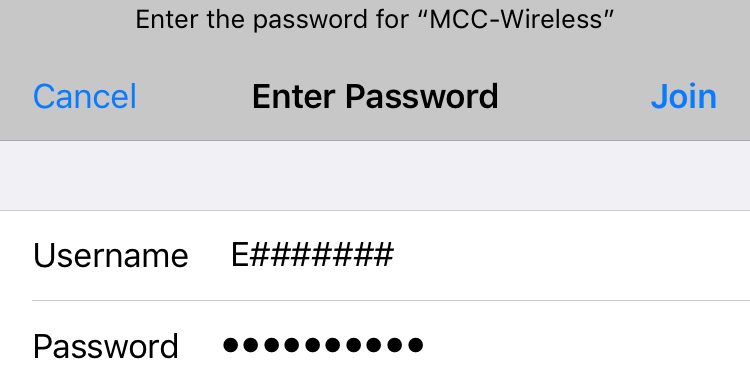
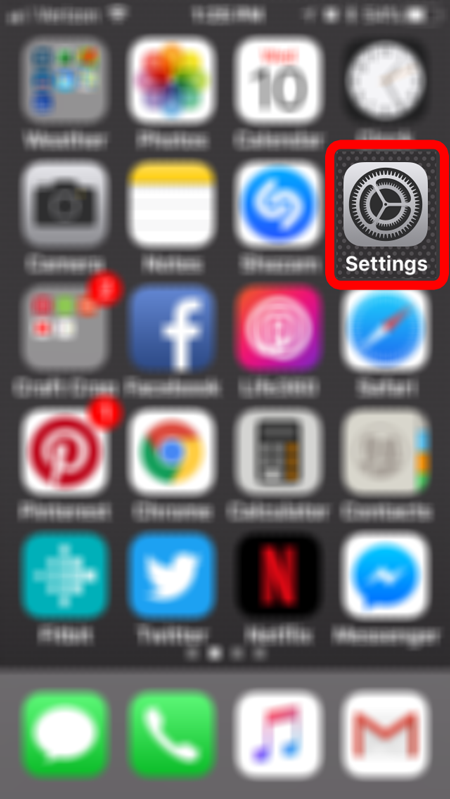
Step 1. While on the Home Screen tap on "Settings".
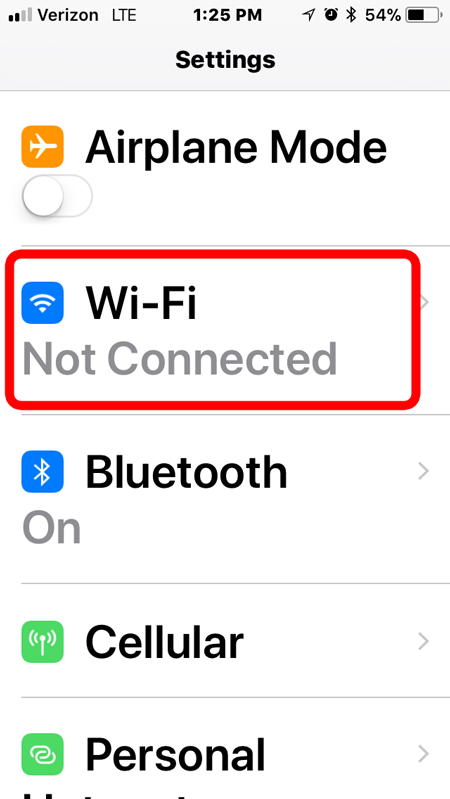
Step 2. Tap on "Wi-Fi".
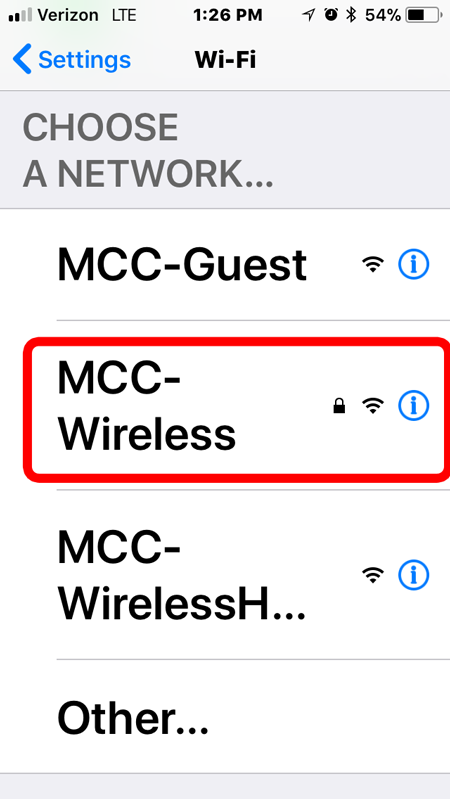
Step 3. Tap on "MCC-Wireless"

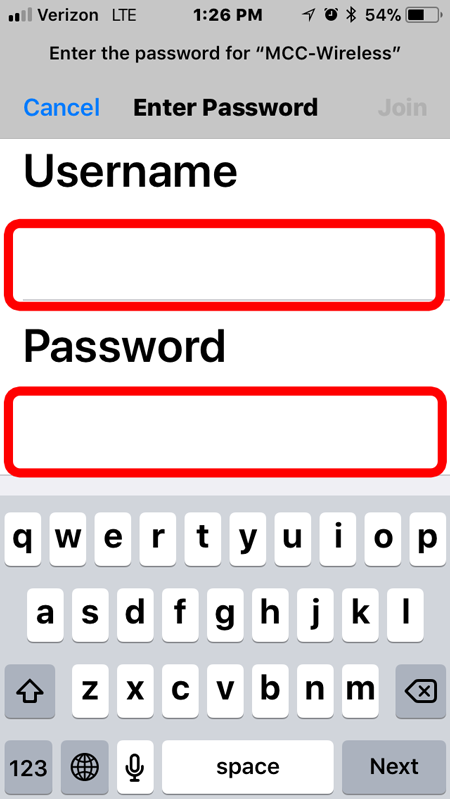
Step 4. When prompted, enter your myMCCKC UserID and Password. Tap on "Join".
Step 5. Tap on "Trust" at the top right.
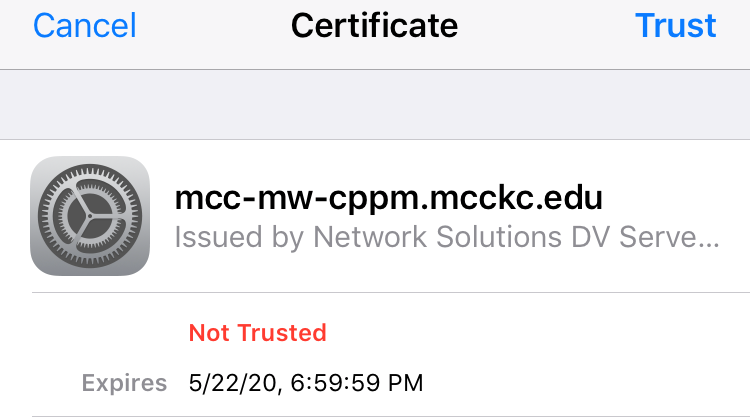
Step 6. If you see check next to "MCC-Wireless" and your signal level you are connected.

To connect an Apple mobile device to the MCC Wireless network:
Step 1. Press the Home button. Navigate to Settings.
Step 2. Press the Wi-Fi button. Make sure the Wi-Fi is turned on.
Step 3. You may have to wait a moment as your Apple device detects wireless networks in range, and displays them in a list.
Step 4. Press the Wi-Fi network name MCC-Wireless.
Step 5. When prompted, enter your myMCCKC UserID and Password, and press Next to Join. This will complete your connection to the wireless network.
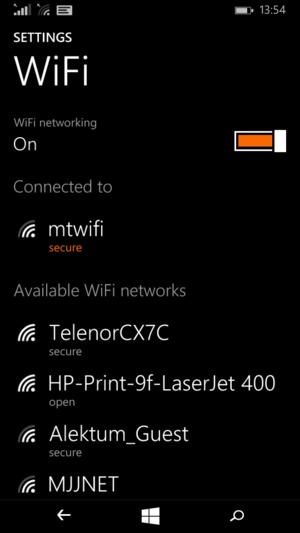
To connect an Windows phone to the MCC Wireless network:
Step 1. Swipe left.
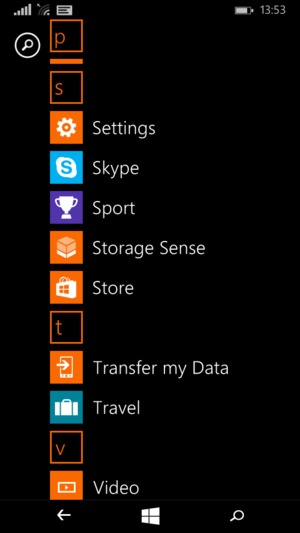
Step 2. Scroll to and select Settings.
Step 3. Select WiFi
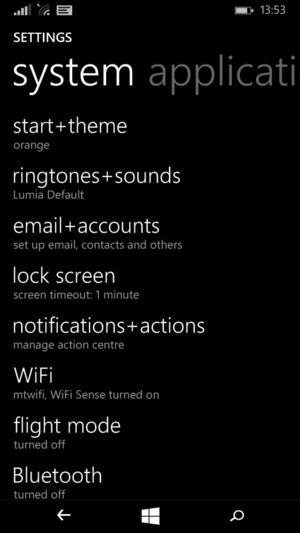
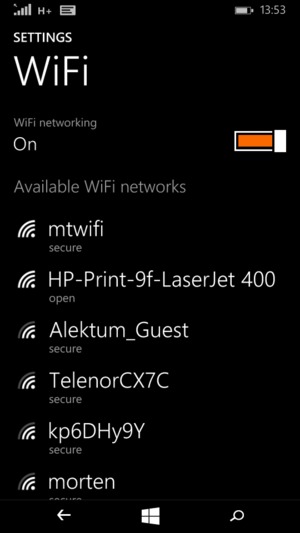
Step 4. Turn on WiFi networking
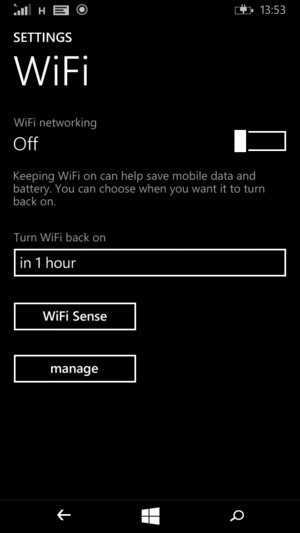
Step 5. Select MCC-Wireless from available networks
Step 6. Enter your myMCCKC userID and password and select done
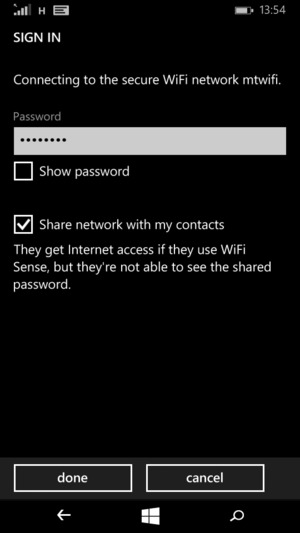
Step 7. You are now connected to the Wi-Fi network
Images taken from www.helpforsmartphone.com
By logging into MCC Wireless you are agreeing that you will adhere to the required processes to protect the confidentiality and appropriate use of college data and will abide by MCC's COMPUTER AND COMPUTER TECHNOLOGY USAGE Board Policy 2.25050 BP and all applicable policies, procedures, regulations and laws, including those regarding confidentiality and data security. All information contained in the MCC network and databases are the property of the College and are to only be used to support normal institutional duties. I also understand that failure to adhere to the confidentiality and usage guidelines may result in disciplinary action up to and including termination/expulsion.